Search This Blog

Powered By Blogger

Friday, 30 April 2010

Wallace Collection/ ウォレス・コレクション

I went to The Wallace Collection today with my friend Momo.
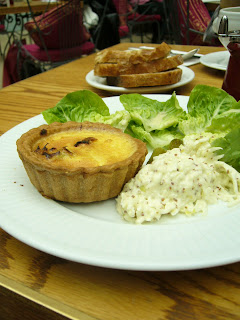
I confess that our main objective was to have lunch there, rather than visiting the museum..  the museum has a lovely restaurant, which is like a very large conservatory.  You can feel like being outside and yet be covered.  It is a wonderful idea in a place like London, where you can't predict when it's going to start raining...
Momo had soup, and I had a quiche.  We were both happy with our orders.


After that, we shared a set of Afternoon Tea...
I liked the scone, which was rather on the bien-cuit side.  The pastries could have been a bit better, but I do think they looked cute and fun.


After our lunch and tea, we had a quick visit inside the museum.  I have visited Wallace Collection several times, but I still haven't seen all the rooms.  It is a beautiful mansion, and I highly recommend a visit to anyone who comes to London.
It is known for its Rococo-style paintings of Boucher, Fragonard and Watteau - like this famous painting of Madame de Pompadour.  And, there are several Rembrandts, Velazquez, Rubens and many others too!

It used to be a private collection, and is now a national museum.  One of Lady Wallace's conditions when giving the collections to the public was that no piece should ever leave the building, even for an exhibition loan.  Therefore it really is worth a visit, as you can't see these paintings anywhere outside of this museum...!

*+*+*+*+*+*+*+*+*+*+*+


今日はウォレス・コレクションという美術館に友人のMomoと行ってきました。
美術館よりは、美術館に併設されているレストランでのランチが目的だったのですが...。
中庭のようなスペースをガラスで覆ったレストランで、屋根がありながら屋外にいる気分が味わえる、明るくて開放的な空間です。いつ雨が降るか分からないロンドンにはぴったりです。
メニューはカジュアル・フレンチで、Momoはスープとパン、私はキッシュを頼みました。


食後にはアフタヌーン・ティーを頼んで、2人でシェアしました。普段はお昼とアフタヌーン・ティーというような無謀なマネはしないのですが、軽めのお昼+シェアで、適量でした。
ホテルのものよりもかなり大ぶりで、やや焼き色の濃いスコーンがおいしかった。
ケーキの類は、こんな感じでした。かわいい...けど、お味のほうは...あと一歩かな。


食後には、美術館も見学しました。私は今までに、何度かこの美術館には来たことがあるのですが、それでも全ての作品、展示室は見ていません。
特にロココ時代のフランス絵画が充実していて、ブーシェ、フラゴナール、ヴァトーの作品が何点もあります。右は、有名なポンパドール夫人の肖像画。
レンブラント、ヴェラスケス、ルーベンスなどの名画も、何点もあるのですが、そのわりにナショナル・ギャラリーなどに比べて知名度は低いようです。おかげで比較的空いているのもかえって見学者しやすく、この美術館を気に入っている理由の一つです。

現在は国立の美術館ですが、もともと個人のコレクションだったものを、ウォレス夫人が国に寄贈したということです。その際、「収蔵作品は、どれ一つ持ち出さない」という条件をつけたため、現在も展示作品は全て門外不出です。
展覧会への貸し出しも不可なので、この美術館の作品は、ここに来ないと見られません。
ぜひ、ロンドンにおいでの際には、足を伸ばしてみてください。

Wednesday, 28 April 2010

When would you have take away coffee at home?/ 自宅でスタバのコーヒーを飲むとき

I once saw a guy walking into his flat with Starbucks coffee in his hand.  I thought he was awfully lazy.  Why won't he make coffee at home??

Well, I did that today myself.  I had S'bucks takeaway coffee at home.
And I now learned that there are situations where you CANNOT make coffee at home..  like, a blocked drain.


Our drain was blocked for nearly 40 hours, and I couldn't do the dishes, couldn't run the dish washer, couldn't dare run the washing machine, and couldn't shower (but let me add that I went to the gym to shower and my husband's office has a shower).  It seems that the cause was accumulated food waste, which had gone in the waste disposer: the one that "blitzes" the food waste.  The plumber who fixed it said "My advice?  DON'T USE the disposer, just throw it away like you used to do in the old days"...

I am wondering why we have even got a food disposer, if we are not supposed to use it.  Can anyone tell  me?...

*+*+*+*+*+*+
以前、スタバのコーヒーをテイクアウトして、自宅に持ち帰る人を見て、「コーヒーくらい自分で淹れればいいのに、怠けモノだなぁ」と思ったことがありました。

が、自分でやってしまいました。自宅でテイクアウトのコーヒー。
そして、自分で、自宅で、コーヒーを淹れられない状況というものがある、ということも知りました。たとえば、排水管が詰まるとか。


我が家の排水管、40時間近くも詰まってました...(涙)
その間、皿洗いは出来ない、食洗機ももちろん回せない、洗濯もダメ、そしてシャワーも浴びられない(ジムでシャワー浴びてきましたが。会員でよかった、とつくづく思いました)。
原因は、どうもディスポーザーというのでしょうか、台所のシンクに取り付けてある、生ゴミを粉砕して流せるというアレが原因でした。何かを無理に捨てたというのではなく、つもり積もってブロックしてしまったようです。
なおしてくれた水道管屋さんは「オレに言わせりゃ、あんなの使うなってところだね。昔ながらの三角コーナーをつかやあいいのさ」と言ってました。

たぶん、それぞれの家にディスポーザーを設置したものの、その排水が流れ着く先のパイプは昔のままのもので、そのうち詰まってしまう、ということなのでしょう。
使い物にならない文明の利器。
やっぱりロンドンだわ...と痛感したのでした(とは、やはりなかなか英語では書けませんね)。

停電三回に、排水管ブロック。道の向かい側で出火、というのもありました。
次は何が来るかな。

Sunday, 25 April 2010

Bread Pudding/ 朝ごはんにパン・プディング

Don't they always say that if you are eating something sweet and high-calorie, it better be in the morning, because you will burn the calories during the day?  So, that makes breakfast the best time to have desserts!  Well, this morning I made bread pudding - and I consider bread pudding to be more of a breakfast than a dessert...  not sure if it's a common idea though...

In my mind, bread pudding is categorised as the twin sister of French toast.  Recently I was exchanging some e-mails with a friend of mine in Japan, and I think what she wrote summarises the advantage of  bread pudding over French toast: "it's good that you don't have to fry the bread slices one-by-one, but you can bake  it all at once".

I call mine "bread pudding" rather than the English "bread and butter pudding", as I don't use toast bread, and don't butter it.  I think it is close to the French "pain perdu"- but not exactly..

Here's my bread pudding recipe:

Ingredients:
Baguette  about 20cm, cut in 2.5cm thickness
Eggs  2
Milk  250ml
Sugar  50g
Raisins  a handful
Butter  10g

  1. Butter a heat-proof dish that can hold all the bread pieces without piling up on each other.
  2. Heat the milk, and dissolve sugar.  Cool it down slightly (so that the eggs don't coagulate when mixed!)
  3. Whisk the eggs in a bowl, and add the milk.  
  4. Sprinkle some raisins in the dish, place the bread pieces on top of them, and pour the custard mixture over.  Let it sit for about 40min. (photo: at the beginning of soaking)  
  5. Pre-heat the oven to 170c.  Dot with small pieces of butter, and bake for 30-40min.
  6. Serve warm with icing sugar, honey, cinnamon sugar or maple syrup!
Some tips and hints - I made it with half milk and half single cream.  I often have some left-over cream from cooking, so it is a good way of using up cream (if you are like me).  It also is a great way to use a day-old baguette.  I sometimes freeze some small leftover pieces, and make bread pudding over the weekend.

Cutting the bread too thickly will result in rather "bready" pudding, not soaked through with custard- so I recommend not thicker than 3cm.  I often poke the bread with fork, and flip over a couple of times while soaking.
I added some raisins to give a bit of texture - but of course if you are not very fond of raisins, you don't have to (I added some apricots too in the photo).  I am thinking of trying with some sliced almond next time, to give some crunch.. hmmm.

I hope you enjoy - guilt-free desser.. no, breakfast ;)

+*+*+*+*+*+*+*+*+*

よく、「甘いものを食べるなら朝のほうがいい」と聞きます。摂取したカロリーを、日中に消費できるから..だそうです。
ということは、デザートやお菓子は朝ゴハンにぴったり!ということですよねっ。
...というわけで、かどうかは分かりませんが...今朝はパン・プディングを作りました。


パン・プディングは、こちらではレストランのデザートになっていることもありますが、私にとってはどっちかといえば朝食、そうでなければおやつ、という感じのものです。フレンチ・トーストに近いからでしょうか(フレンチ・トーストは朝食ですよね?)。
つい最近、朝食のことで友人と交わしたメールで、彼女が「パン・プディングって、一枚ずつ焼かなくていいのがいいよね」ということを言っていました。そういえば、そうですね。
ホットプレートの無い我が家では、ホットケーキ作りも結構面倒だったりします。

ところで、イギリスで一般的なパン・プディングは、「ブレッド・アンド・バター・プディング」と呼ばれるものです。これは、サンドイッチパンなみの薄さの食パンにたっぷりとバターを塗り、重なるようにしてお皿に並べ、カスタード液をかけて焼いたものです。イギリスの、代表的な「おうちのオヤツ」でしょうか。
私のは、フランスで言うパン・ペルデュに近いようです。フランス人には「違う!」と言われそうですが。

そんなわけで、自己流パン・プディングレシピです。

材料:

バゲット 2.5cmほどにスライスしたもの、合計20cmぶんくらい
卵 2個
牛乳 250ml
砂糖 50g
レーズン 手のひらに小盛り
バター 10g
  1. パンを重ならないように並べられる大きさの耐熱皿にバターを塗る。
  2. 牛乳を温め、砂糖を溶かす。卵が固まらないくらいの温度まで冷ましたら、小さめのボウルで卵とよく混ぜる。
  3. 耐熱皿にレーズンを散らしいれ、パンを並べたら、卵液を上から注ぐ。40分ほど置いて、よくしみこませる(写真は卵液を注いだばかりのものです)
  4. オーブンを170度に余熱する。上にバターを散らしてのせ、30-40分焼く。
  5. 温かいうちに、粉砂糖、ハチミツ、シナモンシュガー、メープルシロップなどをかけて平らげる。

私は今回、生クリームと牛乳を半々にしました。よく、料理の使い残しがあるもので...。バゲットは、買って一日くらい経ってしまったものでもOKです。
ようするに、我が家では使い残し、食べ残しの整理にもってこいということです^^
バゲットの端っこを冷凍してとっておき、日曜日のブランチにする、ということもたまにします。前の晩に焼いて、朝は室温で、でもいいですし、ちょっとオーブンで再加熱してもおいしく食べられます。

バゲットを厚く切りすぎると、中まで卵のしみこんでいないモノになってしまうので、厚切りがお好きでも3cmまでにしたほうがいいでしょう。私はパンに卵液を浸している最中、何度かフォークでつついたり、ひっくり返したりしてます。
上記レシピではレーズンを加えただけですが、写真のものはアプリコットも刻んで加えてあります。なにか食感に変化が欲しかったもので。次は、スライス・アーモンドも加えてみよう、と今から考えています...。

というわけで、砂糖・カロリーとも、朝にぴったり! なパン・プディング、ぜひお楽しみくださいませ。

Thursday, 22 April 2010

Lemon sablée/レモン・サブレ

I like having some kind of home made "treats" handy.  Something you can eat a tiny bit of, when you want to, with your tea or coffee.  I think this is why I often end up baking cookies and butter cakes: they simply last longer than cream cakes and tarts with fresh fruits.  This means you don't have to eat them all at once!


This time, I decided to bake some lemon sablée, before the end of the citrus season.  I normally try to use something seasonal, and aim to have some variety - so if I did something fruity, then I'll bake something nutty next, followed by maybe something creamy, and then something chocolatey...(and I had a trial of peanut cookies last week).

So, here's the recipe:

Ingredients:

Unsalted butter (room temperature) 100g
Grated rind of one lemon
Sugar  65g
Lemon Juice  30g
Flour  150g
Salt  a pinch
  1. Whisk butter and lemon rind in a bowl until light and fluffy.  Add sugar in two batches, and mix well.
  2. Add the lemon juice bit by bit, and mix well at each inclusion.
  3. Sieve the flour with salt, and add it into the butter mixture, in three batches.  Using a wooden spoon or rubber spatula, fold in the flour gently without over-mixing.
  4. Now using your hand, bind the mixture in one, to form a smooth ball.  Wrap the dough in a cling film, flatten, and let it rest in the fridge for 30min.
  5. Take out the dough, lightly knead and make a cylinder - or a sausage, whichever you like to call it.  I like my sablée bite-size, so normally my cylinder's size is around 3.5cm in diameter.  Wrap the cylinder dough in a cling film, freeze it for at least 30min.  
  6. Pre-heat the oven to 170c, and either grease the baking tray or a line the with baking parchment.  Take out the dough and cut with a sharp knife into 5mm thickness.  Place the cookies on the tray, about 5mm apart from each other.  
  7. Bake the cookies for 12-14min, or until lightly golden-brown around the edge.  I normally take the tray out once, rotate and put it back in order to let the cookies colour evenly.
The beauty of this recipe is that you won't have any half eggs or egg white leftovers (unlike most other sablée recipes).  This sablée is quite lemony, and if you like it less acidic, you can also use 15g egg and 15g lemon juice.  The texture will be less short but more soft-crumbly.

I confess that I made a mistake while experimenting with this recipe.  What I did was  that I left the lemon a bit too long after purchasing.
I normally use non-waxed organic lemon, which is very safe to use.  However, this means it dries out quickly too- so when I grated the lemon rind, it was slightly dry, and the rind became rather coarse.  Coarsely grated lemon rind is not nice- believe me.  It gets rather bitter..


I personally prefer to have these sablees with tea, rather than coffee (I have a theory that "fruity" and "spicy" goes better with tea, while "creamy" and "chocolatey" goes better with coffee).
But I thought the sablée looked pretty with espresso in a photo...

+*+*+*+*+*+*+*+*+*+*+*+*

我が家ではほとんどいつも、自家製のお菓子があります。食べたいときに少しだけ食べられる甘いもののあるのが、好きなもので...。私の作るものに焼き菓子が多いのは、たぶんこのためだと思います。
生クリームを使ったスポンジケーキや、果物のタルトなどだと、作ってすぐに食べないといけないけれど、焼き菓子ならば置いておけて、少しずつ食べられます。


今回は、レモンのサブレを焼きました。そろそろレモンのシーズンもおしまいですし(といっても、一年中手に入りますが...)、先週はピーナッツクッキーの試作を重ねていたので、フルーティなものを、ということで。

レシピです ↓

材料

無塩バター(室温に置いておく)
レモンの皮のすりおろし レモン一個分
グラニュー糖 65g
レモン汁 30g
薄力粉 150g
塩 ひとつまみ
  1. バターを泡だて器で軽くなるまでよく混ぜる。砂糖を2回に分けて加える。
  2. レモン汁を少しずつ加え、その都度よく混ぜる。
  3. 薄力粉と塩を混ぜてふるい、3回に分けて2.に加える。木ベラかゴムベラに持ち替え、練らないようにさっくりと混ぜる。
  4. 手を使い、なめらかになるように生地を一つにまとめる。ラップで包み、手で平たくのしたら、冷蔵庫で最低30分休ませる。
  5. 生地を取り出し、軽く折りたたむようにして全体の温度を均一にし、直径3.5センチくらいの円筒に形を整える。再びラップでくるみ、今度は冷凍庫で30分以上寝かせる。
  6. オーブンを170度に余熱し、オーブントレイにバターを塗るか、オーブンシートを敷く。サブレ生地を取り出し、よく切れるナイフで5ミリ厚さにスライスし、最低5ミリ間隔をあけて並べる。
  7. 12-14分間、縁がキツネ色に色づくまで焼く。(私は焼き色を均一にするため、途中で一度取り出し、オーブントレイを180度回転させています)

このレシピの良いところは、卵の使い残しが出来ないことです^^。
かなりレモンの味が強い(=酸っぱい)ので、もう少し柔らかい味が好きな人は、全卵15g、レモン15gにして作ってもいいでしょう。レモンだけだと「かりっ」と「さくっ」のあいだくらい、卵と半々にすると、もう少ししっとりとした食感になります。

今回、試作を重ねる途中で私は一つ失敗を犯しました...
レモンを買ってから、使わずに置いておきすぎてしまったのです。
通常、ワックスなしのレモンを買っていますが、やはり乾燥するのが早いんですね。乾きはじめたレモンの皮をおろすと、粗くなってしまい、サブレが少し苦くなってしまいます。
というわけで、ぜひ新鮮なレモンの皮をおろして使ってください。


デミタスカップのソーサーに置くと、ちょうどいい大きさ。
...ですが、このクッキーにはコーヒーよりも紅茶のほうが合うと思います。
個人的には、「フルーツ」「スパイス」系のお菓子には紅茶、「クリーム」「チョコレート」はコーヒーを合わせています。
ぜひ、紅茶と一緒にどうぞ!

Sunday, 18 April 2010

Tea-torial at Brown's Hotel/ ブラウンズホテルのティー・トリアル

Today I went to Brown's Hotel for Tea-torial.  It is an event held every other month to show how the pastries for afternoon tea are made.  The guests are invited to the underground kitchen, and Fabien, the Head Pastry Chef and his assistant Ines show you how they make the traditional British teatime treats.


There were only five of us - apparently two people cancelled.. maybe it was due to the Icelandic ash issue. Right in front of us, Fabien and Ines made Brown's strawberry jam, Victoria sponge, scones, Dundee cake and cupcakes.


The recipes are relatively simple.  Fabien says "I want to show them something that they can really do at home", and I am sure the people today will happily make these cakes at home!
He gives you small but useful tips such as "what to do if the dough started curdling", and "how to use vanilla pods".


The session finishes with real afternoon tea at Brown's English Tea Room, and you can carry on asking questions about pastry making to Fabien.  I was there for work, so skipped the tea, but I did manage to take a nice photo of the afternoon tea stand...

.. and when I was leaving, Fabien generously gave me some take-away goodies!  I always love his macaroons :))


Fabien will be going to Japan for an event - "Tea-torial in Japan" - in May, and I am working on this project with him.  I think it will be fun, presenting real, traditional British teatime favourites to a Japanese audience!

*+*+*+*+*+*+*+*+

今日はブラウンズ・ホテルの「ティー・トリアル」というイベントに行ってきました。これは、アフタヌーン・ティーのお菓子がどのようにして作られるのかを、実際にホテルのキッチンに行って見せてもらえる、というものです。
ヘッド・パティシエのファビアンと、アシスタントのイネスがいろいろと作ってくれました。

今回の参加者は5人。7人が定員なのですが、2人キャンセルが出たのだとか。例のアイスランドの噴火のせいでしょうかね...。
少人数なので、まさに目の前で作る様子を見ることができ、質問もできます。
今回の内容は、ブラウンズ特製イチゴジャム、ヴィクトリア・スポンジ、スコーン、ダンディー・ケーキとカップケーキ。


ヴィクトリア・スポンジは、バタークリームとイチゴのジャムをサンドした、イギリスの代表的なケーキです。同じ生地を使って、ルバーブのコンポート入りのカップケーキも作りました。
人気のスコーンは、ファビアンの特製レシピで、いわゆる「腹割れ」のない、お饅頭のような仕上がりが特徴です。しっとりとして、特製ジャム、クロテッド・クリームとよく合います。
最後のダンディー・ケーキは、スコットランドの街、ダンディー発祥とされる、ドライフルーツたっぷりのケーキです。
ブラウンズ・ホテルでは、アフタヌーン・ティーの最後にヴィクトリア・スポンジとダンディー・ケーキを、ワゴンでサービスしてくれます。
それまでにお腹が一杯になってしまいますが...。

レシピは、いずれも比較的簡単なものばかりでした。ファビアンは「実際に見た人たちが、家で本当に作れるもの、作る気になるものを見せたい」と言っていました。
ま、イギリス菓子って、そもそも素朴ですしね...
作りながら、ちょっとした「コツ」も伝授してくれます。「卵を加えて、分離してしまったらどうするか」「バニラビーンズの扱い方」など。

デモンストレーションを見たあとは、実際にホテル内にあるイングリッシュ・ティー・ルームでアフタヌーン・ティーが楽しめます。ファビアンも同席するので、さらにお菓子の話で盛り上がるようです...が、私は今回は仕事として参加したので、お茶はパスしました。
今日のアフタヌーン・ティーは、こんな感じ。明日からはまた新しいメニューだそうです。


そして、お土産ももらっちゃいました ^^
チョコレートフィナンシエのカップケーキと、色とりどりのマカロン。パッションフルーツのマカロンが特に美味しかった!


ファビアンは、5月には日本でこのティー・トリアルのデモを行います。私もコーディネーターとして関わっており、今日も行ったのもそのためでした。
イギリス菓子のデモンストレーション、日本での反応はどんなものでしょう...?楽しみです。

Saturday, 17 April 2010

ロンドン桜めぐり/ cherry blossoms in Kensington

東京では桜というとソメイヨシノが一番多いし、ぱっと思い浮かぶと思うのですが、ロンドンでは実にいろいろな種類の桜の花が咲いています。
先週の土曜日から約一週間かけて撮ったものを、ご紹介します。

これは、ケンジントン・ガーデンズで毎年4月の中旬頃から咲く、真っ白な桜。小ぶりで丸い花弁は、梅の花を思わせます。

ちょうど満開でした。
花の時期も長くて、1週間くらいたっぷり楽しませてくれます。


同じく真っ白な桜。これは白妙という種類の桜ではないかと思うのですが、確信はありません...。ホランド・パーク近くの大きなお宅の庭から枝を伸ばしていました。


こちらは、ホランド・パーク内の日本風庭園の桜。ロンドンでは珍しいのですが、ソメイヨシノではないかと思います。
大きな鯉が池に泳いでいたりして、なかなかこぎれいなお庭です。


ここではコブシも咲いていました。
こんな光景、日本では珍しくないけれど、ロンドンだと思うとちょっと不思議な趣です。
鹿威しまでありました。


これは、ハイストリート・ケンジントン近くにある大学脇の桜。たぶん鬱金(ウコン)という品種です。写真だとあまり分からないかもしれませんが、黄色の桜です。わりと欧米でよく植えられているのだとか。東京ではあまり見ませんでしたが、高校のときの通学路に大きな鬱金桜の木があり、毎年待ち遠しかったのを覚えています。

桜ではありませんが...見事なハクモクレンの木が、ケンジントン・ガーデンズにあります。こちらはピンクの木蓮(マグノリア)のほうが多く、白い木蓮は珍しいようです。抜けるような青空の日でした。


そして、その根元には、ピーナッツをくわえたリスが...
リスは全然珍しくないのですが、思わず可愛くてシャッターをきってしまいました。

陽射しに恵まれる日の多い一週間でした。
こんな日が続いてくれるといいのですが...まあ、ロンドンなので無理でしょう...。

+*+*+*+*+*+*+*+*+*+*+*+*+*+*

I grew up in Tokyo, and for me, "Cherry Blossom" was equivalent to Someiyoshino, the most common cherry blossom in the Kanto area.
However in London , there are so many different kinds.  Here are some of the photos of sakura that I took during the week.

These are lovely, small white blossoms that I found in Kensington Gardens.  They have round petals that remind me of plum blossoms.


The timing was perfect - in full bloom!  The tree looks so graceful and beautiful with the white veil, and it is a pure delight to see these flowers, every year in April.  Normally the flowers last for at least a week.


Another white blossom.  I am guessing that these might be Shirotae - but I am not sure.  I found this tree near Holland Park, stretching out from the garden of a private house.


This was a tree in the Japanese Garden inside Holland Park.  I think this could be Someiyoshino.  There is a pond with carp and a small waterfall inside this garden.  Very pretty and pleasant.

Small magnolia behind the Japanese style stone lantern..  Looking at this photo, it is almost difficult to believe that it was taken in London!  


These must be Ukon - which means turmeric, or the yellow colour that comes from the dye made from turmeric.  The tree stands by a university building near High Street Kensington.  It's got a pretty shade of lemon yellow, which is quite unique for cherry blossoms.  Apparently it is popular in the West, and you don't see a lot in Japan.


Not cherry blossoms - but beautiful white magnolia.  I think white ones are quite rare in London...

...and a squirrel by the trunk of the tree.
There are almost too many squirrels in the park, and I normally don't bother taking photos of them, but this one looked cute and funny, so I took a picture.


It was a rather pleasant week with some days of sunshine, and the weekend was absolutely wonderful.  So sunny and warm.  
I wish it would be like this throughout spring and summer .. but yes, of course I know, it's London.. that is waaaay too much to ask for!!

Thursday, 8 April 2010

Home made granola/ 手作りグラノーラ

I don't know where I got the idea.. but I thought I'd make my own granola.
After going through various websites and various boxes of granola at supermarkets, and several trials, I think I created my own granola recipe that I am happy enough to share with my friends.


It is easy, though a bit time-consuming. I am still not sure if this is actually less expensive than buying the ready-made ones..  but what I can guarantee you is that it tastes so much nicer!!  You won't regret making this, and you will want to make more, again and again.

So, here's my recipe..

Ingredients:
300g rolled oats (Jumbo ones are even better, don't use instant oats)
70g  almond flakes
40g cashew nuts
40g pumpkin seeds

1/2 teaspoon cinnamon
A pinch salt
100g  clear honey
20g  brown sugar
2 tablespoon vegetable oil

100g raisins (or sultana, increase the quantity if you like!)
30g chopped dried dates
40g chopped dried apricots
15g banana chips
15g dried cranberries

  1. Pre-heat the oven to 160c.  Mix cinnamon, salt, sugar, honey and oil in a small sauce pan.  Warm the pan over low heat and melt the sugar.  
  2. In a large bowl, combine oats and nuts (DO NOT mix the fruits at this stage).  Pour 1. into the bowl, and mix well to let the liquid coat the nuts and oats evenly.
  3. Line a baking tray with a non-stick baking parchment.  Spread out the oats evenly, and bake in the oven for 30min.  Take out the tray every 10 min, and mix well, in order to colour the oats evenly. 
  4. Once baked, cool in the tray until completely cool.  Add dried fruits and banana chips.  Keep in an air-tight container, and consume within 3 weeks.

I haven't tried it yet, but you can substitute the honey with maple syrup.  You can also add, or omit whichever nuts/ dried fruit you like.  I found that the tang of cranberries and the rich sweetness of dates work very well.

It makes a great breakfast cereal, and I like having it with yoghurt, rather than with milk.  I know that I can add more honey/ sugar and oil to make it crunchier, but I prefer to keep the flavour balance as it is now.  Making your own granola also makes you recognise how much sugar and oil is in your morning cereal bowl...  It is an interesting exercise.


In Japan, we used to say "you should ideally take 30 different food ingredients a day".
Well, we stopped this propaganda, as the government thought it unrealistic, but well..  you can take more than 10 different kind of food ingredients in a bowl if you have this for breakfast!!
.. or have it any time of the day as a great snack :)

+*+*+*+*+*+*+*+*+*+*+*+*

あるときふと、「ウチでグラノーラを作ってみよう」と思いたちました。
いろんなサイトを調べ、いろんな市販のグラノーラの箱(の原材料リスト)を見て、何度か試した結果、ようやくこれ!というレシピが完成しました。


ちょっと時間はかかるものの、難しいことは全くありません。
売っているグラノーラは高いけれど、自宅で作ったら安上がり...かどうかは、分かりません(使う材料によりますね)。
でも、手作りしたグラノーラは、美味しいです!
私はこれを作って、今後市販のグラノーラを買う気はなくなりました。

ということで、レシピです。

材料:
オートミール (Rolled oats) 300g
スライスアーモンド 70g
カシューナッツ 40g
かぼちゃの種 40g

シナモン 小さじ1/2
塩 ひとつまみ
ハチミツ 100g
ブラウンシュガー 20g
サラダ油 大匙2

レーズン 100g (好みで増やしても)
干しなつめ 30g
干しアンズ 45g
クランベリー 15g
バナナチップス 15g

  1. オーブンを160度に余熱しておきます。小さめの鍋にシナモン、砂糖、ハチミツ、サラダ油を入れて中弱火にかけます。ふつふつとして、砂糖が溶けたら火をとめます。砂糖は完全には溶けません...
  2. 大きめのボウルにナッツ類とオートミールを入れ、1.の液体を注ぎ、木ベラなどを使ってよく混ぜます。ここではドライフルーツは加えません。
  3. オーブントレイにオーブンペーパーを敷き、2.を移しいれ、表面を均一にならしてから、オーブンで約30分焼きます。10分ごとに一度取り出し、焼き色が均一になるように混ぜます。
  4. 30分焼いたら、トレイのまま冷まします。完全に冷めたら、ドライフルーツとバナナチップスを混ぜ、密閉容器に保存します。3週間以内に食べ切ること。

オートミールは、一番一般的なのは「クエーカー」というメーカーのものだと思います。日本でもそんなに高くないのではないでしょうか。栄養価も高いので、一度買ってみてください。
私はハチミツでしかトライしていませんが、メープルシロップを代わりに使っても良いそうです(コストが気になりますけど...)。
他にも、上記のレシピでは、日本で手に入りにくい材料もあると思うので、ナッツを全部アーモンドにしてしまうとか、胡桃を加えるとか、適宜変更してみてください。こちらのグラノーラには、よくゴマやひまわりの種が入っています。
ドライフルーツも同様です。クランベリーの酸味とナツメ(デーツ)の甘さのコントラストが気に入っていますが、日本ではあまり普通のスーパーに売ってませんよね...。レーズンとアプリコットとか、干しイチジクなんかでもいいと思います。

私はもっぱら、これを朝食に、ヨーグルトと合わせて食べています。牛乳よりもしとらなくていいからです。もっと油と砂糖・ハチミツの量を増やせば、かりっとして、あまりしとらないグラノーラになるのは分かっていますが、これ以上甘くしたくないので、あえてこのレシピをおすすめします。自分で作ってみると、普段食べているシリアルの油脂、砂糖の量を考えるようになるかもしれません...。


昔、「一日30品目の食品を摂取しよう」って言ってましたよね。最近は言わなくなったようですが。このグラノーラを食べると、朝食だけで10品目以上の食材を食べられます^^
作り置きできるので、ぜひ時間のあるときに作って、平日の朝食にどうぞ。